Tuesday, December 15, 2009

Filling In The Insides


We are working away on getting the inside finished up. The holidays are getting in the way, but we are making progress. You can see one of us chatting with the homeowner. The cabinets are getting installed and most of the lights are in. You can see some red fabric hanging about on the right side. That is for cushions going into the library tower.

Thursday, October 29, 2009

Its Shaping Up


Well, the windows have to be cleaned, lights have to be installed and a few touch ups are jet to be done, but it is already looking quite spiffy.

Thursday, October 22, 2009

Painting Painting Painting


Our painters were working hard today on the exterior. It is turning out beautiful. Everybody is happy; the homeowners, the painters and us. And these shots were taking at a cloudy moment. The building was radiating in the sun.


even redder in contrast

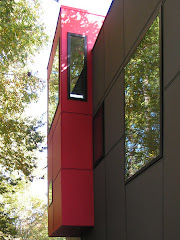
You can see the darker color of the main building mass next to the red library box.

Wednesday, October 21, 2009

WE SEE RED


The first splotches of red are appearing on our"red boxes". Aaaaaaaghhhhhh. Gorgeous.
The top caps for the roof were going on today as well. They are still missing over the red area. The undersie of the red boxes are going to be red as well.

Tuesday, October 20, 2009

The first hint of Red and Cabinetry

We started today on the exterior painting. But as we don't have pictures of it yet, here is a shot from the hallway. The curved ceiling above the staircase coming up to the second floor received the same red that the exterior library volumes will too. The painting here is obviously not done.


We stopped by the cabinet maker again today. This is the piece that goes into the hallway. As a matter of fact it fits into the same hole that you see in the picture of the last post below.

Tuesday, October 13, 2009

Colorful Colors

Can't help but to show you some more of the colors. The pictures are a bit fuzzy, but they still make us smile. The image above is a look into the hallway. You can see the bookcases missing and the flooring. It's going to be magnificent when it is all done.


These are two of the girls' rooms.


Monday, October 12, 2009

First Finishing Touches

We stopped by our cabinet maker today. We had been messing around with the details of the simple shelving boxes for the library. We ended up with a reveal detail that made him and us happy.

The first bits of color are appearing. This is the beginning of one of the three bedrooms. Each of our client's three girls picked their own color scheme with us.


Thursday, October 1, 2009

did you see the "RED" ?


We mean red. These are the exterior color choices. We spent some good time yesterday with the client and went over the color scheme. It's going to be drop-dead gorgeous.

A Good Look


Here is a good shot of the current state. As you can see, we are missing the caps on the roof parapets and the top of the awning. Also keep in mind that the exterior color is yet to change. The little box sticking out from the wall as well as the volume housing the library in the rear is going to be red and the main part of the building is going to be of a darker color.

Solar Thermal Panels Installed

The Solar Panels were installed. As you can see there are two of them. They are being hooked up to the plumbing system with a holding tank and back-up electrical heater. They will supply the hot water for the entire building. The cost of the system will be offset by the lack of utility bills within a few years.

Watch a quick and dirty YouTube clip on it. (We are no cinematographers here, but give it a try!)

Solar Thermal Panels Installed

Wednesday, September 23, 2009

More Sights of Siding

See the post below of more information. Keep in mind that these are not the final colors. Note the detailing around the windows and the building corner:


Tuesday, September 22, 2009

Siding in Sight

The siding is going up this week. Here you can see how the Hardie Panels are being installed. We are very specific about the detailing. Each panel is lined on all sides with a 1/2" reveal, a shadow line. These lines are being extended to create a cohesive pattern. The building corners, as well as the windows and other elements are treated the same way. We worked out the constructional details of these shadow lines with our siding crew to allow for optimal water run off and final looks.
These Hardie Panels and the flashing pieces of the shadow lines are going to be painted later on uniformly.
Another area will receive a metal siding. We will show you more as it goes up.

Saturday, September 12, 2009

And dryer walls ......

Here is another shot of the library area being prepared by the drywall
crew. After painting the shelving units will go in.

Thursday, September 10, 2009

Dry Walls

You can see here the drywall work shaping up in the library/play area.
A prototype of the shelving pieces is loosely hanging in its spot, as
well, for testing.

The little Red Box' Cap

Today the cap for our little red box was installed. We are getting
ready for siding. In the meantime the drywallers are going crazy in
the inside.

Thursday, September 3, 2009

Compliments

Today we discovered that somebody was appreciating our work. To whom
ever it might be: "Thank You!"

Thursday, August 27, 2009

Rummaging In the Intestines


We are now busy with all the interior guts of the building. That is plumbing, electrical lines, and the heating and air conditioning system. The last couple of framing pieces are being taken care of as well. Next week we are planning to install the insulation.

Friday, August 14, 2009

A Pile Of Wood

The framing of the library tower is turning out to be quite a forest.
But luckely the framing crew is made of excellent craftsmen.

Awning Support


These are the vertical steel awning supports that are in between the individual windows of the hallway. You can see how they tie back into our LVL structural beam. The brackets are going to hold the horizontal arms that are going to stick out from the building by 4'-10. We went for this solution, where the arms are going to be bolted in, then leveled, and in the end welded in the field. This way we are allowing for an easier installation and perfect leveling and straightening out of all pieces in the field.


There are the horizontal members going in.

Roofing

You can make out some of the layers going into the roofing. It's a flat roof, almost flat that is. It has as slight slope of 1/4" in 12" to insure the water is running off into the direction you want.
The last layer is a white reflected surface that is glued on. It will be highly reflective to decrease the heat impact of the sun. In this picture you can also see the plumbing vent coming from the bathroom. it is going to be cut of to the height of the parapet, so that you won't see it. We guided it through the parapet, so that we do not have an unnecessary penetration through the roof proper.

Tuesday, August 11, 2009

More Framing

We are almost done with framing. You can make out all the volumes now
nicely. The steel studs in the bank of windows are up as well. They
will hold up the awning. The plumbers, roofers, and hvac folks are
moving in now.

Thursday, July 30, 2009

Street View

Here you can see the look from the front street. It is quite tamed from this vantage point. Our modern addition will peer naughtily with a smirk over the rest of the house. Enough to make you wonder.

Thursday, July 23, 2009

Framing


We are into the framing stage. The partial demo work on the existing garage went well. All the site protection and preparation also went smoothly. We had to have a service change done to the existing electrical system, so that our clients can continue using the main house during the construction. Some plumbing lines had to also be temporarily capped.
You can make out already the beginnings of the little "red box" sticking out, as well as the location of the bank of hallway windows.

Thursday, June 25, 2009

The Development of an Idea

The "library tower" came about, as we were working out the hallway and common areas between all the bedrooms. We tried to assemble here a few sketches and drawings to illustrate how an idea like this develops. The first images shows the first quick attempts to hold on to a fleeing idea. Following is a preliminary sketch we presented to the client. And the last image shows the whole building section as it was used in our construction drawings:


The end result is a world of books and toys that surround a playfully climbing set of bookshelves. It ends in an elevated platform that is surrounded by large windows, a perfect spot to cuddle up and get lost in a good book. Note how the shelving is set into the walls, the floor and the ceiling. On the opposite end this corridor juts out over the backyard and existing terrace in a low "red box". This is the extension of the play area into a nook, which is also defined by a window.
This area is also integrated into the hallway, as you can see in the plan. In conjunction with the bank of floor-to-ceiling windows in the extra wide hallway an area of play is created. It makes good use of the square feet that have to be allocated to circulation and offers a rich and wonderful environment.

Friday, June 19, 2009

The Floor Plan

Here is the floor plan. The steps on the bottom left lead up to this new second floor. Since the garage below is a little lower than the main floor and we are dropping the new second floor down, lower than what the existing garage ceiling is, the stair is not a full staircase. You are only climbing a half story up. This helped increase the connection of the new children’s world to the rest of the house. The stair ends right next to the breakfast room and kitchen area.
You can easily make out the three bedrooms and the bath. Look also at the wider hallway that turns into the “library tower” and the little”red box”, on the top and bottom of the plan respectively. More about those later.

The Preliminary Design Sketch

This is the preliminary design sketch of the addition. The existing house’s layout is basically an “L”-shape. The smaller leg goes off from the back of the house and houses the existing garage and guest suite. In this sketch you can see the mass of the existing house on the left. You are standing on the terrace located in the inside corner of the “L”, and you are looking towards the addition.
On the first floor the garage and guest suite remains. The garage door is on the opposite side of this view. The existing first floor is going to be re-clad to match the second story addition and unify this wing of the house.
You can see some of the basic elements of the design here. A modern and simple general look, the wide open hallway with its large windows. The “awning”. The little “red box”. And the climbing “library tower” sticking up in the back.
This addition will create three bedrooms for the three young daughters of the homeowners, a bath for them, and an area that playfully integrates circulation, the library and plenty of play area.


Getting Started

As we are getting started on the construction of this addition, we decided to offer a blog on the progress of creating a modern dwelling. A lot has happened already. And as we are posting moments of the upcoming steps, we will also throw in information on the work leading up to now.

As all our projects, we have had initial meetings, contract negotiations, and site analysis. We measured and documented the existing house, gathered zoning and other restrictions and information, and had lots of discussions and meetings on the wishes and needs of our clients.

In this case we also developed several concepts to find the best way, place, and form for all the whishes our clients asked of the changes to be made to their house. This version, we decided on in the end, is a second story addition over the existing garage and guest suite wing.

What followed was a design development with hand drawn elevations and floor plans. These lead to fully fledged construction drawings.

As we moved into the construction phase, we worked out a full cost analysis that resulted in a lot of meetings with sub contractors on site and options for the home owners.

We will expand on all of these steps in future posts. In the meantime enjoy following us as we are getting ready for some demolition work and new construction. Don’t forget to visit us at dialectdesign.com.